



Anna Mason is an esteemed watercolour artist, who is known for her stunning, realistic depictions of the natural world. Anna runs her own online school, which has thousands of subscribers from around the world. Having interviewed Anna Mason last month about her latest book ‘Watercolour World‘, I decided to try one of the exercises in the book to see what I could learn. I was amazed by the results of following her step-by-step ‘painting a sunflower’ project. Here’s how I got on!

Selecting a Project
‘Watercolour World’ offers 4 different projects – Blackberry, Autumn Leaf, Sunflower and Garden Bird. I chose the Sunflower because I thought it might be a bit easier, and I’m often drawn to painting and drawing flowers. I paint and draw quite frequently, but I don’t usually try to paint as much detail as Anna does! Because I usually simplify what I see quite a lot, following Anna’s project was a good way for me to try and slow the painting process down. It helped me commit to creating a ‘realistic’ image.
Tracing the Drawing
I decided to take up Anna’s offer of starting with a tracing of her own outline drawing of the subjects. Outline drawings for each of the projects can be found at the back of the book. In the absence of tracing paper I photocopied the page from the book and went over the lines in a soft 7B pencil. I then put this face down on to my watercolour paper and then shaded with pressure over the back of the photocopy with a harder H pencil. This pressure deposited the 7B lines on to my watercolour paper reasonably faintly. I could see the lines but not so prominently that they’d show up through layers of watercolour. I reinforced some of the lines in the head of the sunflower free-hand.

I then followed the project step by step.
What it was like to follow the project
If I’m brutally honest, I did ‘cheat’ here and there. Anna recommends a hot press paper and advises on the sizes of brushes you paint with, but I worked with what I had, which was a moleskine watercolour sketchbook with cold pressed paper (albeit a very lightly textured one in comparison to other cold press papers) and I used size 0 brushes where she advised a size 1. But I think so long as you roughly stick to the plan you will benefit from following the instructions.

Challenges
The biggest challenge for me was sticking to the instruction, but through applying myself to the best of my ability I believe I got results I would not have achieved otherwise. Why was sticking to the instruction so hard for me? First of all, some of Anna’s instruction is hard to put into words; I suspect following one of her online tutorials might be easier where you can see her demonstrating. Sentences such as ‘These lighter midtones are the areas of the petals that are lighter than the mid-midtones but not as light as the lightest tones painted on the previous page’ took me a while to get my head around!
The Understanding Follows The Doing
I soon found that if you relax about trying to understand the concept of each stage and instead simply follow her literal instruction in the second paragraph of each stage (I.e. ‘mix this colour with another colour and apply here with a size 0 brush’ etc.) then the conceptual understanding will follow in its own time. There’s also some very handy greyscale photos of the sunflower with the areas that you should paint in each stage highlighted in bright pink which I found very helpful.

The second part of the challenge was resisting the temptation to go on my own journey with the painting – I was enjoying the painting too much! As the pages went on I moved further away from the reference photo at the beginning of the chapter which meant I should probably have flicked to and fro a lot more than I did. Instead I looked to her painting, which is shown at each stage, for guidance.

I realised towards the end of the project that Anna’s approach is about constant comparison of tone and colour – going back and forth and adjusting very carefully.

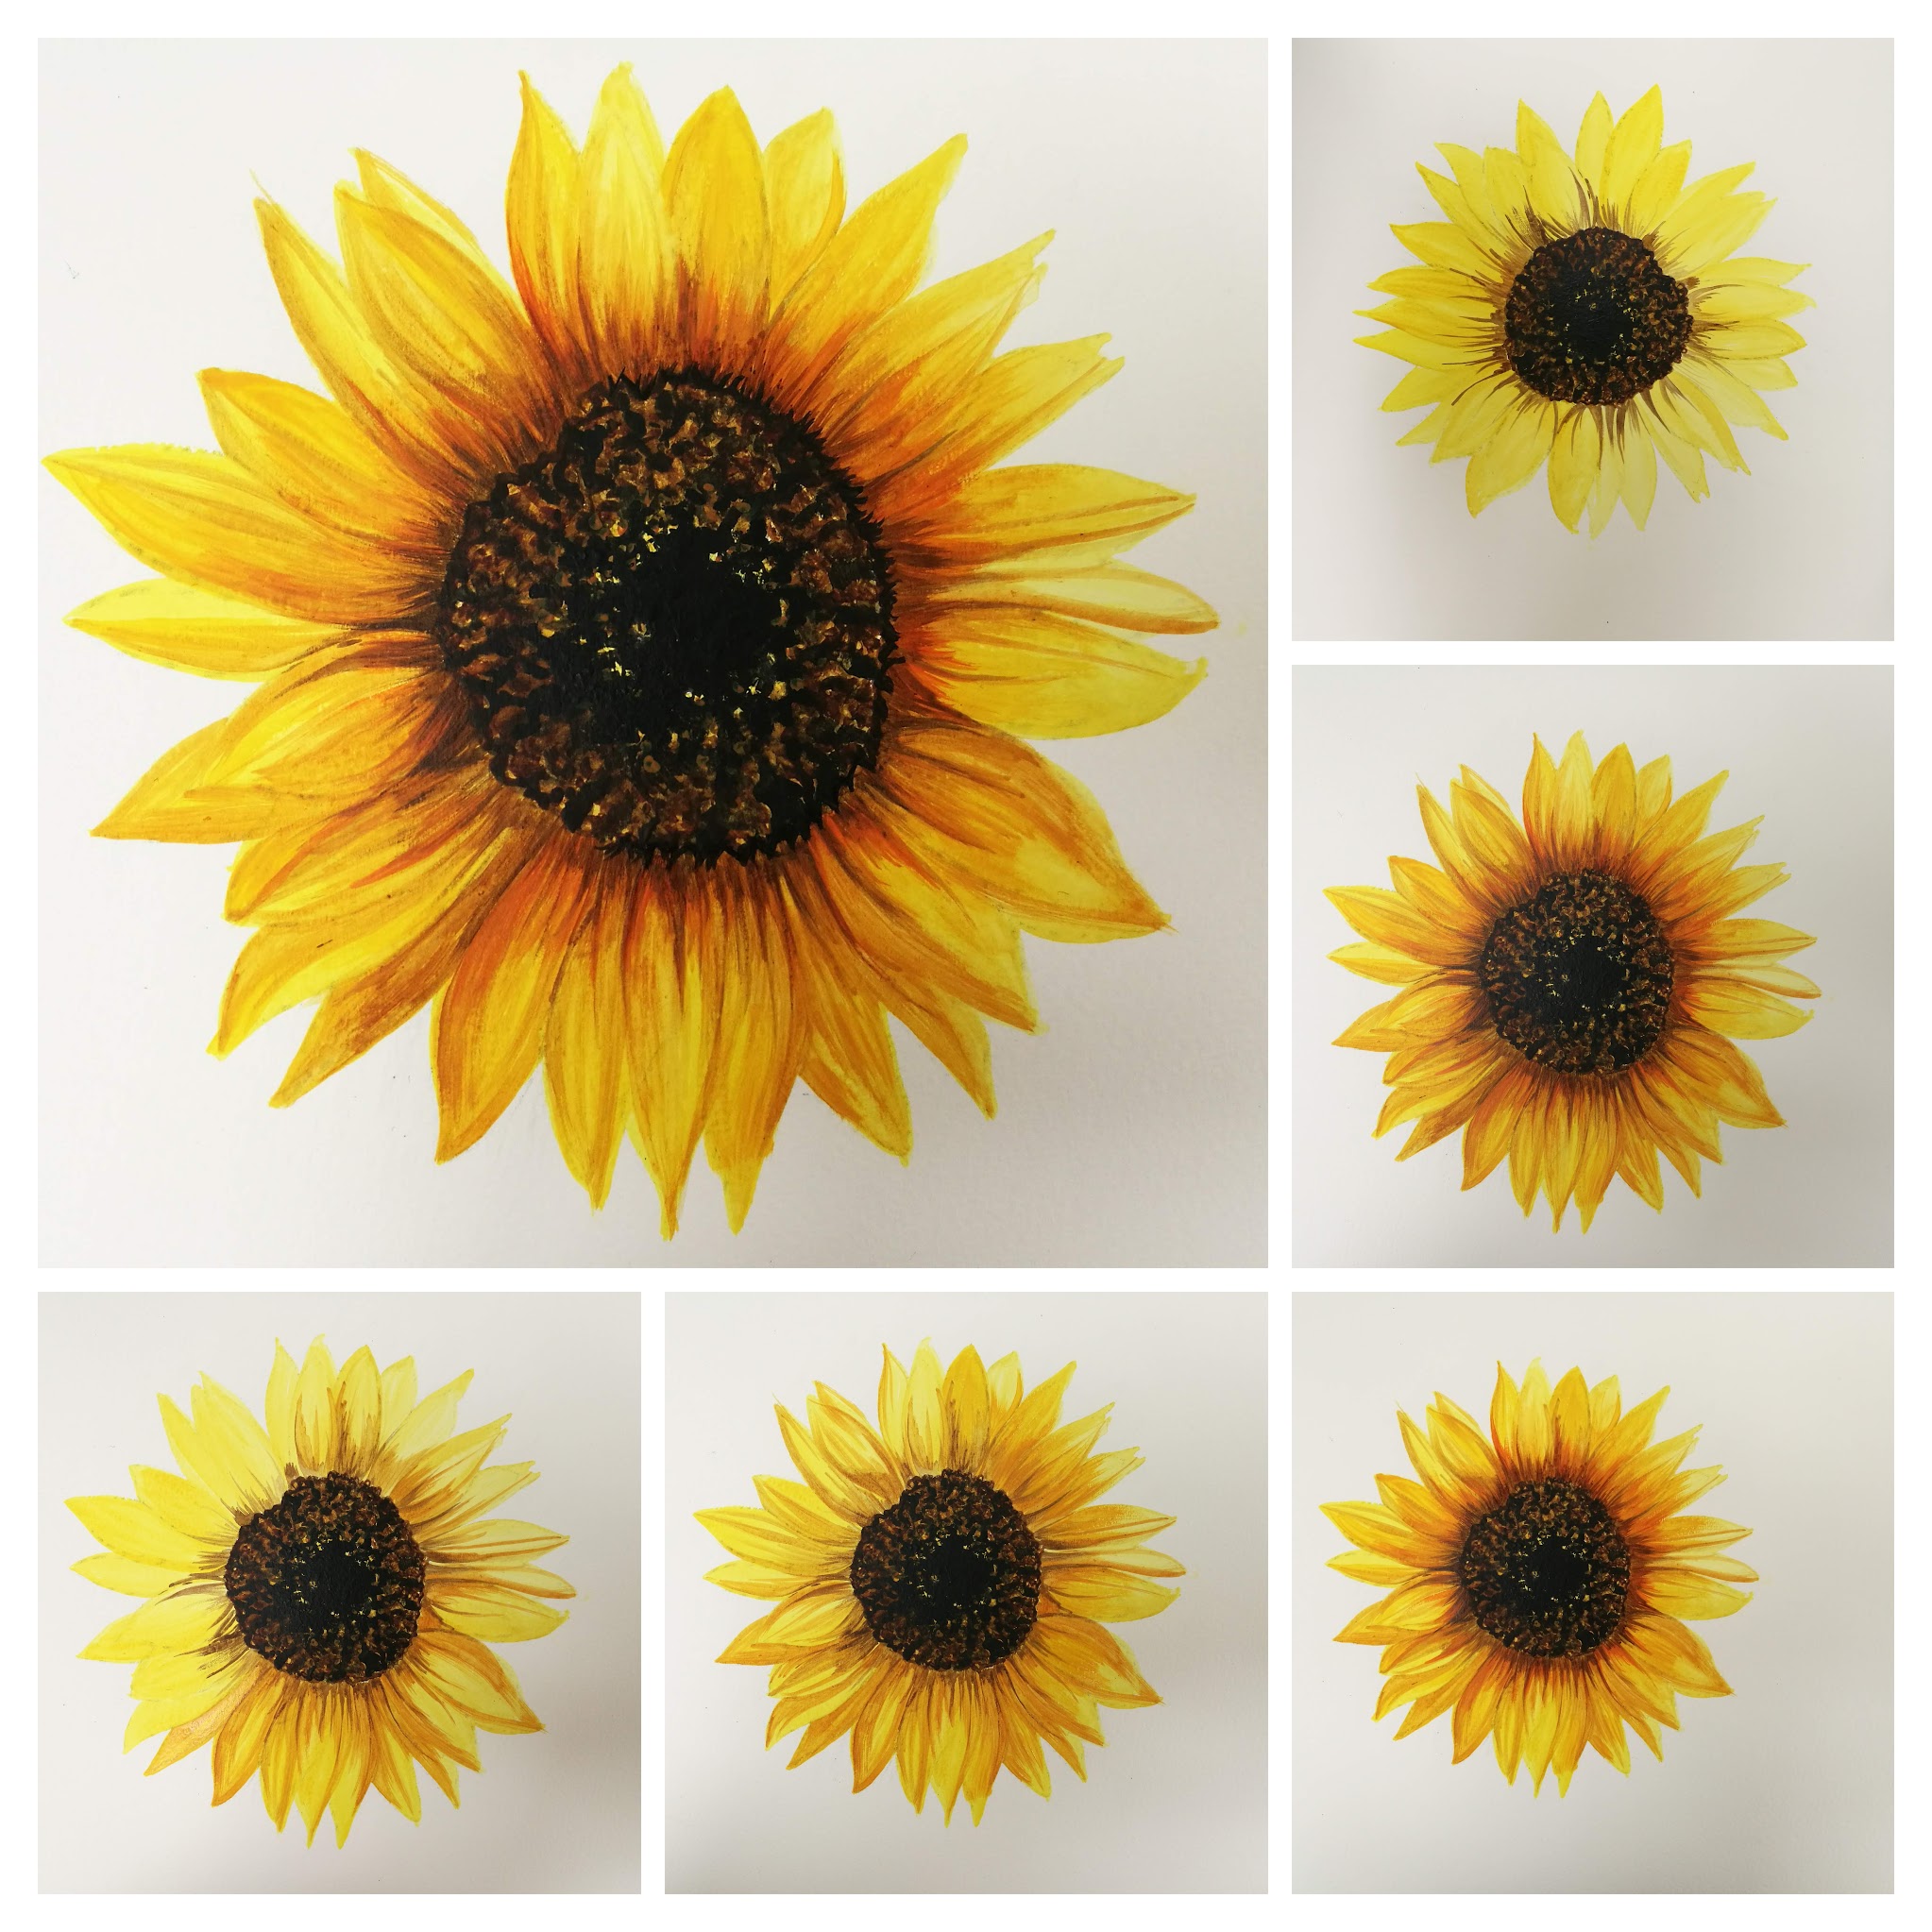
My final painting looks nothing like anything I’ve ever painted before and I surprised myself that I could paint a flower as detailed as this!

I finished the painting with my head fizzing. What could I achieve if I tried to capture this level of detail in my work in the future? Anna will doubtless inspire many readers to paint images from photos. Since completing the project I have thought about collaging imagery together to make highly detailed, slightly surreal looking work. This book offers a helping hand when you want to slow down your painting. Anna’s instruction guided me to a realisation that I can paint highly detailed watercolours too!


4 thoughts on “Attempting the Anna Mason Approach”
Well done Lisa! Your sunflower is great! Love that you really
started to get the process! You’re right – seeing a video is
always a bit easier than me trying to describe the concept of
what I’m doing – but I always like to try and explain why it is
I’m instructing you to do something at a specific stage in the
painting so that it can start to make sense and mean you can
apply the knowledge to your own work. I hope you’ll try some
more detailed work in future – you’ve clearly got the eye for it!
🙂
Hi Anna,
Thanks so much for your kind words and taking a look at my review! I can totally see that your descriptions would make more sense the more one got stuck into this painting approach. It’s like learning any new skill; it’s natural to feel a bit lost and out of one’s depth but with practice the penny drops and everything makes sense! I’m looking forward to trying again!
Lisa
I joined Anna’s online school maybe 3
years ago and have done several of
her projects. I was more than shocked
at what I could do by following her
instructions, because I’d never
painted before. I was more of an
occasional #2 pencil sketcher. I’m
all in with watercolor now. My first
palette was my “Anna Mason” palette
and I still use it more than any other.
That’s great, thanks Lori!
Comments are closed.