



Historically, watercolour paintings have been displayed framed behind glass because they are on paper which can be stained by dirt and dust, can’t be cleaned with water, and wrinkles with humidity. In addition, the watercolour paint itself is vulnerable to being re-dissolved with water. What if you wanted to paint a watercolour on a surface other than paper, one that is less sensitive to water like canvas – is there a way to make the watercolour paint permanent so it can be framed without glazing like an oil painting?
To clarify, it is not necessary to varnish a watercolour painting and varnishing is not usually done for traditional watercolour paintings. But there has been some interest lately in varnishing watercolour paintings because some artists would like to paint on canvas or mount the paper on wooden panels and want to show their paintings without glass, and they like the different look of a watercolour that has been varnished.

Use Acrylics like Watercolour
One solution is to paint with acrylic in washy, transparent layers or wet-into-wet, that looks like watercolour but is water-resistant when dry. Some open-submission watercolour competitions allow acrylics painted in this manner. The only real drawback is that, unlike watercolour, the paint won’t re-dissolve after it has dried, either in your work or on your palette. Many painters take advantage of the re-dissolvability of watercolour paint to lift paint off the painting as part of their painting process, so for them it’s an important part of how they paint.

If you wish to use acrylics in the manner of a watercolour, be aware that a very dilute acrylic may not have enough binder to make the paint waterproof. You can remedy this by using a fluid acrylic or an acrylic ink to ensure that you can get a washy consistency and still have enough binder for it to dry waterproof, because you won’t need to add as much water to create a wash. Using Airbrush Medium instead of water to make the paint more fluid without thinning it of acrylic binder, works well.
Very fluid acrylics are just as concentrated in colour as the heavy body paints but don’t have thickeners added, so you don’t need to dilute them as much to get a wash. You may wish to add a flow release agent to the acrylic mixture or to the paper to allow even washes (it prevents beading up) and you may wish to apply a watercolour ground if you are painting on canvas.

Use Aqua-Fix
Another solution is to use Schmincke Aqua-Fix, a liquid which when mixed with watercolour paint will make it dry water-resistant. This can also be useful for painting layers in any regular watercolour painting. Be aware that if you mix it with the paint in the pan, the paint will harden and be ruined, so the idea is to use the Aqua-Fix instead of water on your brush and palette. It makes it a bit more like acrylic.

Use a Varnish or Fixative
Another option to make your watercolour painting less vulnerable to moisture is to use a varnish or fixative on the finished painting. I know that a brush-on, water-based varnish is not a good idea as it would smear the painting. But a spray-on fixative or a brush-on varnish that is not water-based will not re-wet the paint. I wanted to see which ones work best.
We have two products specifically for sealing watercolour: Schmincke Watercolour Fixative which is an aerosol and Daler-Rowney Watercolour Varnish which is a thick liquid applied with a brush. I wanted to see how well they work and if other solvent-based varnishes would work, also. Some artists use wax to seal their paintings so I wanted to try that as well.
I tested the following fixatives and varnishes in 1, 2 and 3 coats:
- Schmincke Watercolour Fixative (spray)
- Jackson’s Pastel Fixative (spray)
- Golden Archival Varnish Matt (spray)
- Daler-Rowney Watercolour Varnish (brush-on)
- Roberson Picture Varnish Matt (brush-on)
- Roberson Beeswax Picture Varnish (rub-on)
- Gamblin Cold Wax medium (rub-on)
These are the questions I wanted to answer:
- Do they disturb the paint when applied?
- How do they change the matt sheen of the painting?
- Do they darken or lighten the colours?
- How waterproof are they?
- How many coats do you need to apply to make it waterproof?
- Do they behave differently when applied to work on paper and to work on canvas that has a coating of absorbent ground?
- Daler-Rowney varnish is alcohol-based. What alcohol do you clean brushes with and can you thin it with that also?
- Is Schmincke Watercolour Fixative any different to a Pastel Fixative?
- Is Daler-Rowney Watercolour Varnish any different to a solvent-based varnish like Picture Varnish?
- Would a spray varnish that is solvent-based like Golden MSA Varnish work?

Some Things to Consider Before You Try This
There are a few things to be aware of when you are considering varnishing your watercolour painting.
- The addition of varnish to a watercolour painting will change the look and feel of the work, some more than others.
- The varnishing of a watercolour painting is a non-reversible process so as with all new techniques you are trying, practice it first on a test piece.
- You will not be able to add any more watercolour paint to the surface after it’s varnished.
- Because paper is highly absorbent, any varnish applied to the surface will soak into it and become a permanent, non-removable addition to the piece. This could re-categorise the watercolour as a mixed media piece and potentially exclude it from being considered a watercolour by some societies, museums, collectors, and conservators.
- You have a choice of sheens to consider. Some artists love the effect of a gloss varnish but others think that it begins to look like decoupage, and so they use a matt varnish which changes the look of the the original painting less.

Varnishing a Watercolour – the Testing Results
Skip to a summary of the test results.
The Test Charts
I made up charts with watercolour painted in two thicknesses – a diluted wash and two layers of thicker paint – in four colours, on two surfaces – Canson Moulin du Roy hot pressed watercolour paper and Schmincke fine watercolour primer on canvas panel. I used Jackson’s Artist Watercolours in Phthalo Green Deep, French Ultramarine Light, Burnt Sienna, and Cadmium Red.
The canvas surface was prepared with three coats of Schmincke Aqua Primer fine, the last smoothed with a palette knife, on a Jackson’s Premium Cotton Canvas Board. I let it become touch dry between layers and cure for four days. It was lovely to work on and was very absorbent, the colours dried a bit lighter than on the paper, but it dried evenly, without streaks. It was a very flat surface without the need for paper stretching! You could see a hint of the canvas texture and the surface felt slightly like smooth suede.
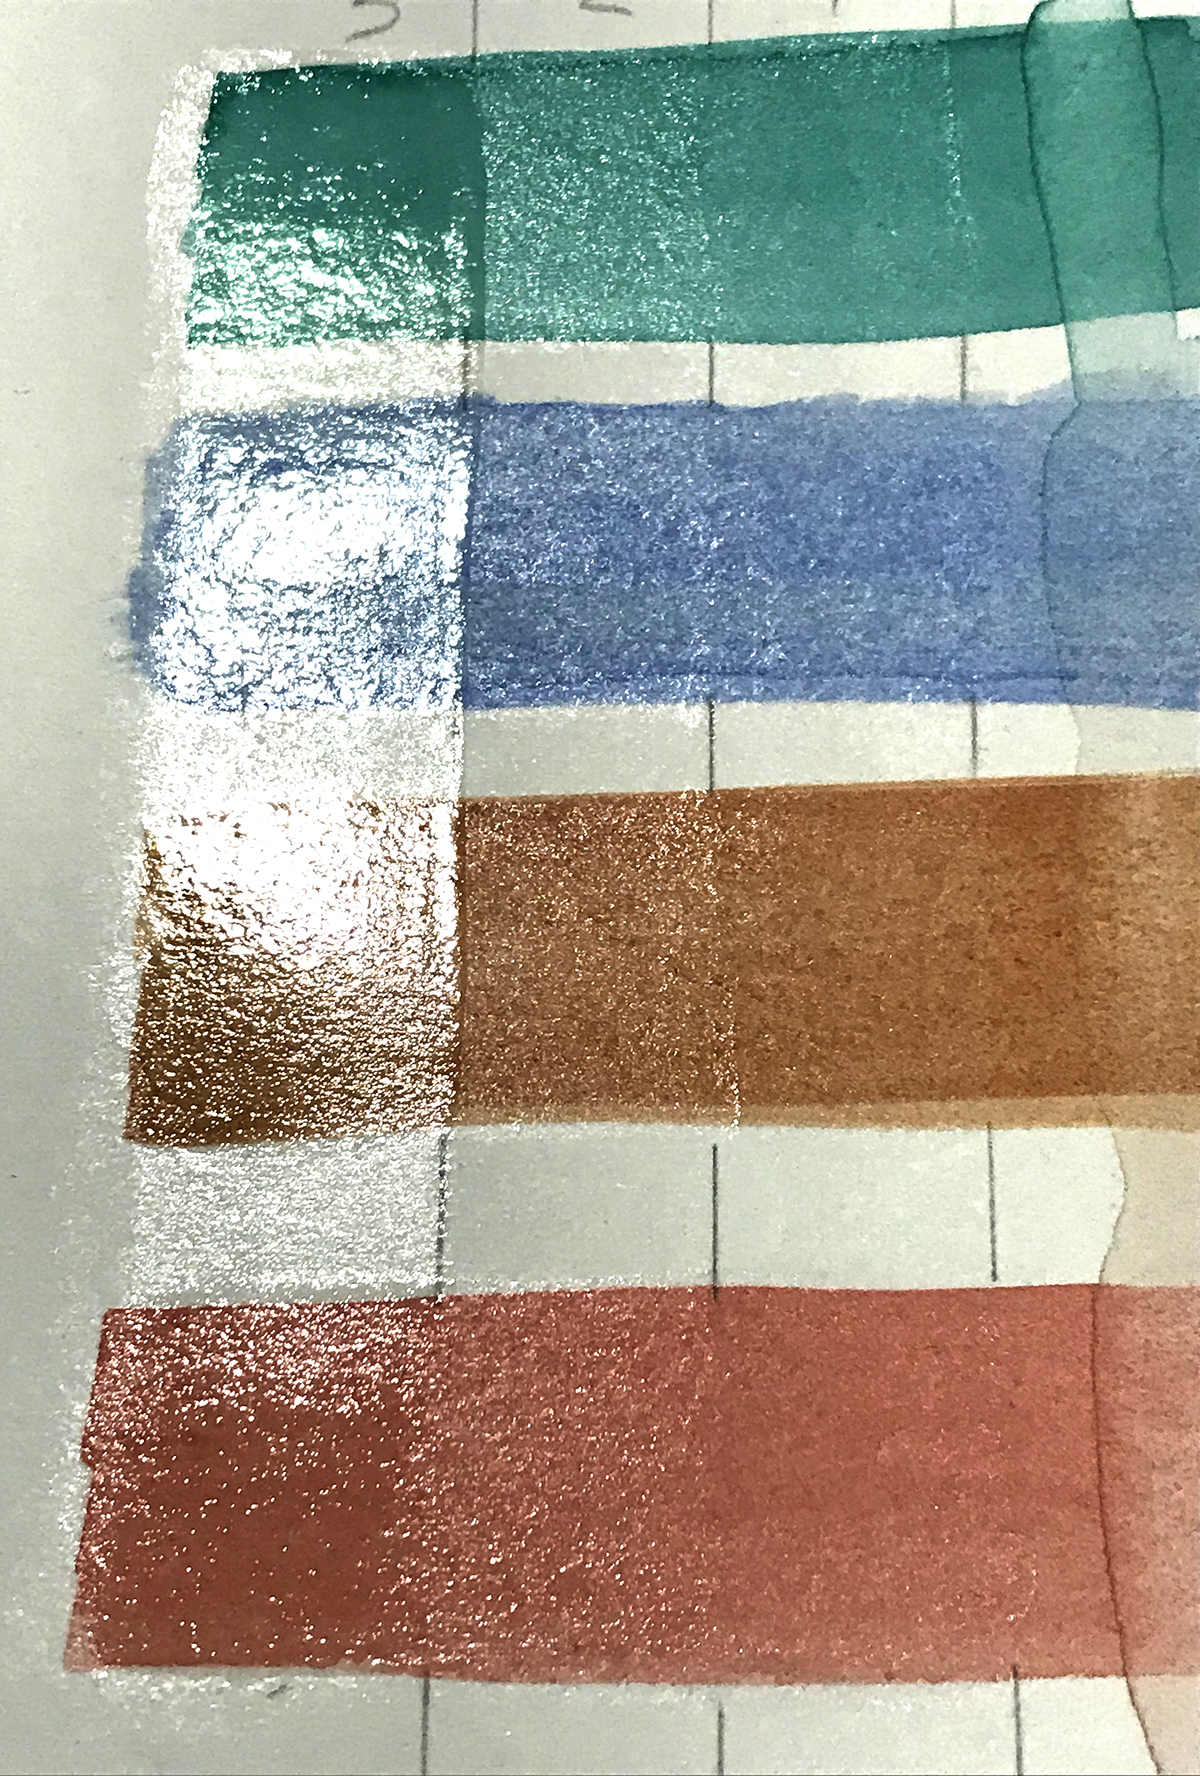
I then applied the fixative or varnish in columns of 0, 1, 2, 3 coats. When it was dry I ran a wet paintbrush over the colours trying to re-wet them. All colours with zero fixative re-wetted easily, though the watercolour painted onto the absorbent ground on canvas panel was harder to re-wet than those on watercolour paper. It was more absorbed into the surface and better adhered. This was especially true of the single light wash layers. As more layers of thicker paint were applied, the top layers of unvarnished watercolours were more re-wettable.
Since photographing sheen requires a tilting of the work, resulting in it looking white rather than shiny in photographs, my description of the results may give more information than the photos.
In the results below I have grouped the seven varnishes into three: spray, brush-on, and rub-on.
The Spray Varnishes and Fixatives
By applying a few coats these can be used alone or you can apply just one or two coats to stop smearing and then carefully brush on a water-based varnish.
A matt varnish creates the least change in the appearance of the painting. If you wish to apply a few coats of matt varnish it is best to begin with gloss in order to retain clarity and only use matt for the last coat. If you were to apply all the coats in matt the result could be a dusty look from the many layers of matting solids. The dusty lightening is most visible on dark colours, so you may also wish to use a gloss varnish on a dark painting and only use matt on a lighter painting.
For these tests I sprayed the coats lightly and evenly from about 25cm distance.

Schmincke Watercolour Fixative (spray)
Fixing
To seal the paint from moisture more fixative is required on paint on paper than on the watercolour ground applied to canvas. On the treated canvas, a watercolour wash requires two coats for all the colours I tested, but that more thickly applied paint requires two coats for some of the colours I tested (Cadmium Red and Burnt Sienna) and three or even four coats for some of the colours I tested (Phthalo Green Deep, French Ultramarine Light). So it would make sense to use three or four coats across most paintings for complete fixing. On paper you need at least four coats for a heavier application of paint. Except for Phthalo Green which was a big problem, it wouldn’t fix on paper in a wash or thicker. I tried the same colour in another brand, Daniel Smith, and it had the same problem.
Surface Sheen and Colour Change
The surface became more glossy with each coating. Two coats is matt or satin depending on the colour of paint and three coats is satin to glossy depending on the colour of the paint. It did not darken or alter the colours in any application. Although Schmincke say that after a few coats the colours may darken, I did not find this to happen.

Jackson’s Pastel Fixative (spray)
Because pastel fixative is a matt, spray resin, basically a light varnish, I thought I’d add it to the testing.
Fixing
Two coats for most colours and three coats for Phthalo Green. So it would need three coats for most paintings. Same on both light and heavy applications of paint on paper.
Surface Sheen and Colour Change
No colour change. Each application made it a bit more glossy but in a speckled way, so it was more subtle.

Golden Archival MSA Varnish Matt (spray)
This is an extremely well-thought of varnish. But it has a strong odour that lingers, so you will want to spray it outside and let it air for at least a day before wrapping it up. And the solvent smell may still linger on the work.
Fixing
On absorbent ground it took one coat for the washy paint and two coats for the thicker paint. On paper it took one more coat for each.
Surface Sheen and Colour Change
On the washy paint on paper there was no change of colour or sheen. On the thick paint on paper all the colours except ultramarine became deeper, but the blue became lighter. There was very little change to the colour of the paint on the absorbent ground. There was no change to the sheen on either.
Shaking the Can
Spray varnish settles in the can and the nozzle tube reaches down to the thick stuff in the bottom. You need to shake it fully to incorporate the thick with the thin or it could come out in a spitting fashion and if it’s matt you will want to mix in the matting agent or the varnish will be glossy, or streaky. This means you need to shake it for a full two minutes. This can seem like ages, so pick a song or something or watch the video that Golden made to entertain you for two minutes while you shake your can.
The Brush-on Solvent Varnishes
These are mineral spirit or alcohol based so they won’t re-activate the dried watercolour like a water-based varnish would.

Daler-Rowney Watercolour Varnish (brush-on)
It has a mild, surgical spirits odour that goes away quickly. It is thick like honey and a bit hard to spread thinly. So I thinned it a bit with methylated spirits for the first coat. Coats two and three were not thinned. It is pretty fast-drying, if you keep brushing the varnish as it starts to dry it is a bit more matt, so I did that to the second coat. Then the third coat was applied quickly and without thinners and left to dry without disturbing it.
Fixing
Thinned, or brushed while it was drying, or applied thickly – all three methods worked to seal the watercolour with just one coat on both paper and on watercolour ground.
Surface Sheen and Colour Change
All three application methods darkened the colours on both paper and canvas, it was even more visible on the dark colours. The sheen was the thing that was affected by the application method. The thinned varnish and the brushed-while-drying varnish were less glossy, but not in a very even way. Applying it straight from the bottle gives a very glossy, wet-look finish.

Solvents for the Daler-Rowney Watercolour Varnish
I tested four alcohol-based fluids to see if they would work to thin the Daler-Rowney varnish and clean the brush after: Liquitex Pen Cleaner, Pinata Cleaner, Pinata Extender and Methylated spirits. The Liquitex didn’t work for this purpose, the others worked well. We don’t stock methylated spirits, as they now require a special licence, so you will need to purchase that from your local DIY shop if you wish to use it. The Pinata products come in very small bottles so if you can get a hold of the methylated spirits that would be the best choice. I also tested Gamsol, pretty sure it wouldn’t work and I was right. Oil paint solvents will not thin this varnish. Oil paint solvent will cause the varnish on your brush to turn gummy and will not clean the brush.

Roberson Picture Varnish Matt (brush-on)
Because it is matt you need to shake it fully to incorporate the matting agent or the varnish will be streaky. The matting agent used is microcrystalline wax.
Fixing
Two coats are required to seal the surface on both paper and canvas. The surface was slightly waxy and the water beaded up on it when I ran a wet brush over it.
Surface Sheen and Colour Change
I tested it twice and in one there was no change to the colour, in the second test the dark colours were significantly lightened, so I think I must have applied thicker coats. If you wish to keep your colours saturated then apply thin layers or as with other varnishes, only use matt as the final coat.
There was no change to sheen of the painting, it looked the same as unvarnished.
The Beeswax Varnishes
These two beeswax ones – the Roberson Beeswax varnish and Gamblin medium – are very similar. There is a difference in the odour when applying – the Roberson smells like white spirit, the Gamblin doesn’t smell much at all. When the solvent has evaporated both leave the artwork smelling faintly of beeswax, it’s quite pleasant.
Neither of these products is described as a watercolour varnish and neither manufacturer mentions that you can use it on paper. But artists have been using these waxes and similar wax mediums to seal watercolours for at least the last eight years with no noticeable problems and it has become very popular in the last few years. Beeswax has been used as a painting medium and preservative for thousands of years. It is a stable and long-lasting finish on wood, canvas, paint, and paper.

Note the cloth above – buffing the green area with 1 coat of varnish took off some colour, buffing the blue area with 2 coats of varnish did not.
Application
These varnishes are thick pastes and can be difficult to apply with a brush so are usually rubbed on like shoe polish. I have seen many artists using their finger to rub it on, but if you don’t want to get solvent on your bare skin you can use a lint-free cloth or gloves to apply the wax in a circular rubbing motion to cover the whole painting. I used a sandwich bag with my finger in the corner to rub it on. Wipe off any excess.
When it is dry 24 hours later you can buff it with a lint-free cloth for a satin sheen. I waited an hour between each coat. For both brands the results showed that only one coat was needed to make the paint water-resistant. However when I buffed the single coat to give it a satin shine my cloth came away with colour on it. With two coats it did not. So it takes two coats to be fully sealed.
The only difference between these seems to be that the Gamblin stays a bit more tacky, even more so when it is buffed. It is an oil painting medium and perhaps has less resin than a product designed to be a varnish. A tacky surface is a drawback. The Roberson Beeswax was slightly tacky but not as much and when buffed went away almost entirely.

Roberson Beeswax Picture Varnish (rub-on)
The dried surface is not as sticky as the Gamblin, perhaps because it is designed for the purpose of varnishing. The instructions on the jar say that it may remain tacky if not polished. I found the unbuffed parts were slightly tacky, but far less tacky than the Gamblin. It was not tacky after it was buffed, but it then had a satin sheen.
Fixing
Two coats are required for the paint to be fully sealed.
Surface Sheen and Colour Change
No change in colour and has a waxy matt finish unless you buff it and then it becomes satin.

Gamblin Cold Wax Medium (rub on)
The surface stays slightly tacky, even more so when it is buffed. It is an oil painting medium and perhaps has less resin than a product designed to be a varnish.
Fixing
Two coats are required for the paint to be fully sealed.
Surface Sheen and Colour Change
No change in colour and has a waxy matt finish unless you buff it and then it becomes satin.
Summary of Findings
Non-water-based varnishes and fixatives all work to make watercolour waterproof, whether they are mineral spirit or alcohol based, but some require more coats and some alter the sheen of the painting or the colour of the paint.
If you paint on a surface of primed wood or primed canvas that has three coats of watercolour ground (absorbent ground) applied then you are one step ahead because the paint it better adhered to the surface and requires one fewer coat of varnish than a painting on paper.
Sprays:
The sprays apply the thinnest layer so required at least three or four coats. Some colours were harder to seal than others. Some varnishes got more glossy with more coats while some lightened the colour with more coats of matt.
Brush-on:
The brush-on varnishes worked very well. The Daler-Rowney alcohol-based varnish was very glossy. Since they are all similar to the Roberson’s picture varnish, any oil painting picture varnish should work – if you want it matt then choose a matt picture varnish.
Rub-on wax varnishes:
The rub-on wax varnishes and mediums worked very well. They only made a small change to the artwork, only needed two coats, and were low odour. Some are a bit tacky and some need to be buffed the next day to remove any tackiness. Other brands should work just as well as the ones tested here.
Mounting a Sealed Watercolour Painting onto a Wooden Panel
Framing works on paper behind glass works well for most artists, but unless you use museum glass there is the problem of reflections and if you paint large watercolours it can be expensive or difficult to frame them. While nothing protects a watercolour painting on paper as well as being properly framed, can it be treated so it could be displayed without a frame?
If you wish to seal your watercolour painting on paper and then mount it onto a panel, this blog post about mounting canvas onto panel will help as the technique is the same.
Making a Canvas Painting Panel. The only difference will be centering the finished artwork on the panel. If you need to crop the paper a bit, do it leaving a few millimetres evenly all around, lay it face down on the table, place the panel with adhesive facing down on top insuring you have the same amount of paper all round. Then when you have smoothed it, weighted it and it is dry, you can trim the edges even with a knife.
Try your first one with a less precious artwork and see if you like the effect.
Longevity
All of these products have a good longevity (sometimes called ‘archival’) when used with oil and acrylic on canvas and paper. There should be no difference when used with watercolour. They are artist-quality materials and when the solvents have evaporated you are left with just resin or wax. Some are specifically labelled for use with watercolour, but they are all sound for use with watercolour.
Further Reading
Watercolour Grounds: Painting with Watercolour on Canvas
Preparing Circular Painting Panels
Making Beeswax Impasto Medium for Oil Painting
Tips for Setting Up an Oil Painting Palette
Materials
- Schmincke Watercolour Fixative
- Jackson’s Pastel Fixative
- Golden Archival Varnish Matt
- Golden Archival Varnish Gloss
- Daler-Rowney Watercolour Varnish
- Roberson Picture Varnish Matt
- Roberson Beeswax Picture Varnish
- Gamblin Cold Wax medium
- Michael Harding Matt Varnish
- Pinata Cleaner and Extender
- Moulin du Roi Watercolour Paper
- Jackson’s Premium Cotton Canvas Art Boards
- Schmincke Aqua Primer
- All Watercolour Grounds
- Jackson’s Artist Watercolours
- Acrylic Inks
- Airbrush Medium
- Acrylic Flow Release
- Schmincke Aqua-Fix
- Disposable Nitrile Gloves
- Smooth Wooden Painting Panels
- Snap Knives





35 thoughts on “Watercolour Varnish: Can You Make Watercolour Waterproof?”
Fascinating work — thanks. Another good
way to preserve a watercolour painting,
forever and unchanged, is to use a scanner.
That is of course, true!
Very thorough and extremely helpful. Thank
you so much.
Thank you Jackie!
Best wishes
Lisa
Thank you Jackie, glad you found it helpful!
Excellent article. Very comprehensive and giving a great
deal of information. Thank you.
Thank you Roger!
Thank you Roger, glad you found it helpful!
I shall definitely be giving this a try,
really useful thank you
Thanks Caroline.
Thank you Caroline, glad you found it helpful!
great article. Do you know if any of these products UV protect the watercolour. This is a big issue in Australia and I have been using a non-reflective c=glass the block UV but its expensive
None of these are specially designed for UV protection.
But this varnish is and should work well.
LASCAUX UV PROTECT
Really helpful and interesting. Thank you.
Thank you, Helen.
Thank you Helen, glad you found it helpful!
Thank you for the article, I find it most
informative. Recently I have been
working with watercolour and coloured
pencils on Jackson’s handmade eco
paper (300gsm). Will you recommend
Roberson Beeswax over other varnishes?
Hi Yuan,
It’s really a question of preference. For some beeswax might be a bit heavy and it’s application can result in some of the colour lifting if you apply considerable pressure, so it wouldn’t suit a delicate work, and a spray varnish would be more suitable. If your work on the other hand has a lot of undilute paint and bright colours, and heavy application of pencil, then a beeswax may be more protective.
Hope this helps!
Lisa
Hi Yuan.
Yes, it was excellent!
Super informative article! Thank you!
Thanks, Paula.
Thank you Paula, glad you found it helpful!
This is unrelated to watercolors, but can
matt varnishes be used on dry media and
then work on top?
I remember spraying matt liquitex on top
of pastel on non-sanded paper one time
and then adding more pastel because i
was in a pinch in school been wondering
about alternatives and brands ever since
Hi Ivan,
Yes this is possible, but it depends on what kind of varnish and what marials you are working with. Acrylic varnishes dry quickest and so long as the materials you are working with do not require an absorbent substrate (like watercolour, for example), they can be applied to the surface once the varnish once dry. With regards to varnishing pastels and working over the top, the blog post ‘Not all Fixatives are the same’ has some information you may find useful: https://www.jacksonsart.com/blog/2014/08/29/fixatives-are-not-all-the-same/
Many thanks
Lisa
Many thanks
Lisa
Hi Ivan
Workable fixatives act as fixatives as well as adding texture so you can add more dry media.
A great one is the popular Brush and Pencil Texture Fixative.
Excellent information… Answered so
many questions and clarified so many
doubts. On the whole a brilliant
approach.I would love to get more
regular posts from you. Regards
Thank you, I’m glad you found it helpful!
I started the blog and have been writing for it for 11 years, so there are a lot of past articles you can find that I have written.
I am not writing as much these days as I am spending more time on my own painting practice, but I have an article planned for every 2 months or so.
ahhh this was so helpful!!! i’m doing a
watercolor painting on a canvas with
absorbent ground and i was stressing
out because there are so many options
and i didn’t know what method to
choose. this post went so well into
depth and answered all my questions
like what’s best for canvas, how many
coats, what type of finish would look
best, etc. very grateful for this :))
Thank you, Christina!
I’m very glad you found it helpful!
Thanks a lot!
You’re welcome!
Hi Julie, many thanks for this article, it’s
extremely informative. I’m very curious to
know more about your experience of the
Golden MSA matt varnish on canvas. Did you
apply the gloss version for the first layers
(as recommended) or did you just use the
matt version for all layers? On the leaflet
supplied with the varnish it states ‘do not
use the matt or satin finish on absorbent
surfaces’, do you know why that is? Would
you say from you tests that the msa matt
varnish created the least aesthetic change
on canvas? Many thanks in advance!
Hi Frederic
For the tests I used just the matt product, so the test wasn’t influenced by another product.
But in real life usage I only use matt for the top layer. This means there is less of the cloudy stuff built up in many layers and also since the canvas is now sealed with the gloss, the clear part of the varnish doesn’t soak in leaving the matting material more concentrated on the surface. Which is why you wouldn’t use it on absorbent surfaces. It takes just one coat of matt varnish to cut the gloss, but a few coats of varnish to seal the surface well.
Yes, the MSA might have been the least changing.
Hi Julie , thank you for this very
informative article . My question is if I
add aqua fix instead of water and if I
want to make very fluid paint for poring ,
what else can I use since that would
mean a lot of aqua fix to get the water
color be water proof but also very fluid
and watery ? Hope it is clear ! Thank you
much
You’re right, it sounds like you’d have to use many bottles for this method and that’s not practical. It sounds like aqua fix acts like adding acrylic binder to the paint.
In this situation I would think acrylic would work better than watercolour. If you add a lot of water it looks just like watercolour. And even with a lot of water there is still some acrylic binder to start to make it waterproof, which is more than you have with watercolour paint. Depending on how much water you use, you might not need anything more.
Start with fluid (creamy) or liquid watercolours (sometimes called acrylic inks) as they will be closer to pourable and so only need a little water, which means you will not have to dilute the acrylic binder as much so they remain waterproof.
Comments are closed.